Machine Learning-线性回归(Linear Regression)
本文摘自于:这里
本文覆盖Coursera Machine LearningWeek1&Week2的内容,只记录我觉得值得记录的内容。
Introduction
机器学习的严格定义:A computer program is said to learn from experience E with respect to some task T and some performance measure P, if its performance on T, as measured by P, improves with experience E. (Tom Mitchell 1998年提出)
机器学习的分类有很多种,常见的有监督学习,无监督学习,强化学习等
监督学习(Supervised learning):简单来说就是有一堆样本数据供你分析,每一份数据都会有一个标签,所谓标签就是每条数据都会有一个结果/判断/“正确解”,比如是不是垃圾邮件,房价是多少等,然后算法对下一个输入进行预测。
无监督学习(Unsupervised learning):数据集不会打标签,事先也不知道结果会是什么样的,而是根据样本集的某些特征自动进行聚合(cluster)得到结果
单变量线性回归(Linear regression with onevariable)
单变量线性回归是监督学习里最简单的一个模型,我们先引入一个常见的模型:房价预测。
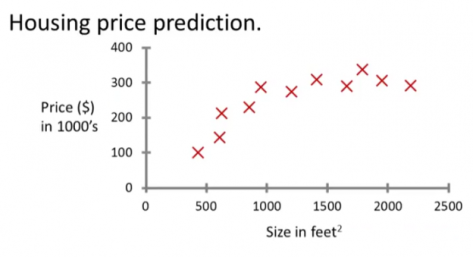
这个东西其实在高中就学过了,给你几个数据,然后让你算出他的模拟函数,最后再预测下房价,很简单。也许你会问,这也叫机器学习?别急,这只是最简单的模型,随着变量的增多,数据集的累积,以及线性模型的种种变体,使得它在多个领域都有很好的应用效果。
Hypothesis Function(假设函数)
hθ(x)=θ0+θ1×1
所谓的假设函数,就是基于样本数据得到的一个能预测新样本的线性函数。
线性回归的目的是通过对样本数据集的分析,能够得到一个最能预测当前样本数据的假设函数,即确定两个参数θ0和θ1,使得样本数据和假设函数之间的拟合度最高,从而达到能更准确地预测新数据的目的。那么如何才能使得他们之间的拟合度最高呢?对于线性回归算法而言,我们可以采用最小二乘法来获得最佳拟合效果,即预测值和真实值之间差的平方和(square error)最小。
Cost Function(暂且称为代价函数)
上面提到的最小二乘法就是线性回归的Cost Function,这个名字起得很好,代价函数,代价越高表示这个假设函数的拟合度越低。所以很多的工作都在追求最小的Cost Function。下面我们来看下线性回归的Cost Function的具体表达式:
J(θ0,θ1)=12m∑i=1m(yi^−yi)2=12m∑i=1m(hθ(xi)−yi)2
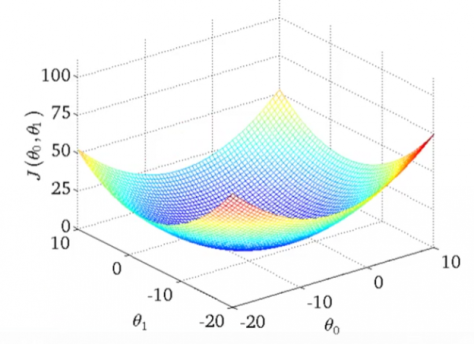
上面我们说的是差的平方和最小,那这里为什么要除以2m呢?因为我们算的的这个函数的最小值,所以在这个基础上再做加减乘除对最终结果是没有影响的,除以2是为了后面的求导可以约掉,除以m是为了保证在样本量很大的时候这个值能变得小一点的,即平方和的平均数。其次,看到这个函数要转换下思维,这里的x和y都是已知的样本数据值,而不是变量。现在的函数的变量变成了θ0和θ1,也就是说Cost Function J(θ0,θ1)是关于θ0和θ1的二元二次函数,简化点就是类似于z=x2+y2这样的函数。这个函数的图像是一个三维的碗型(bowl shape)函数图:
总结一下:线性回归的流程是:先给出一个线性假设函数,然后得到他的cost function,最后通过某种算法求得这个cost function的最小值。下面就介绍如何计算cost function的最小值。
梯度下降(Gradient Descent)
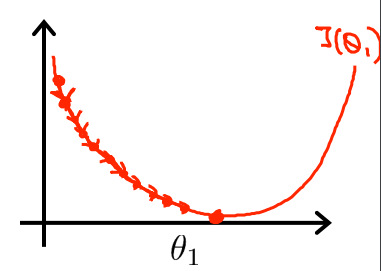
梯度下降法是一个最优化算法,通常也称为最速下降法。简单点说就是沿着梯度向下的方向不断对变量进行迭代减少,不断收敛,以达到局部最小值的目的。所谓梯度方向指的是沿着该变量的切线向上的变化方向,所以梯度下降指的是切线向下的方向。对一个一元函数来说,他的梯度下降过程如下图所示:
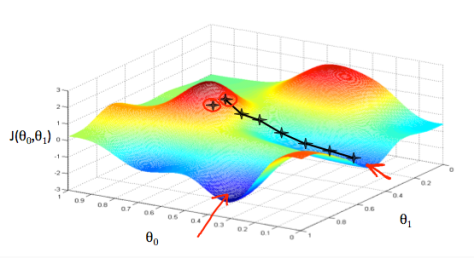
相应的一个二元函数的梯度下降过程就是这样的:
具体地,梯度下降的算法如下:
按照以下公式不断计算 θ:
θj:=θj–α∂∂θjJ(θ0,θ1)
直到收敛
其中,j=0,1 表示的是特征的索引值。
其中,∂∂θjJ(θ0,θ1)表示的是对θj的偏导数,α表示的是下降的步长,也称为learning rate。这里的α值要控制好,如果太大则不会收敛;如果太小则收敛太慢。
如何正确地迭代?
正确的方式:
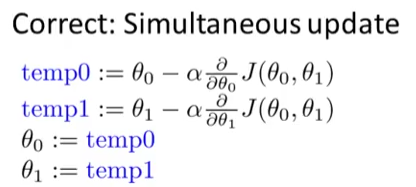
而不是:
也就是说要把所有的θ都算出来之后再进行下一轮迭代,而不是边迭代边使用新的θ值。
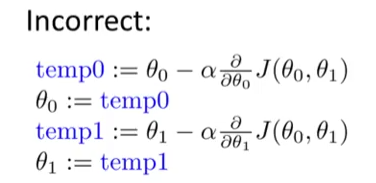
对于线性回归而言,我们只需要带入公式,对cost function的两个变量θ0和θ1分别求导数,皆可以得到梯度下降公式:
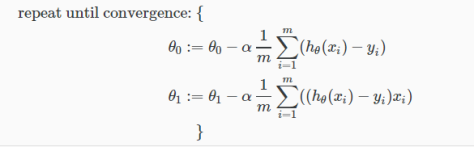
咋一看θ0和θ1求导出来的函数还有点差异,但你稍微思考一下就会发现两者其实是一模一样的,因为可以在θ0公式的后面默认乘以一个x0,而x0=1。求导过程就省略不说了。这里我们可以发现以上每一步迭代都用上了所有的样本数据(对导数求和),所以这种梯度下降也被称为“批量梯度下降”(batch gradient descent)。
多变量线性回归(Multivariate Linear Regression)
多变量线性回归和单变量线性回归本质上是一样的,只不过特征(feature)的数量变多了,唯一值得说道的是在多变量线性回归中引入了矩阵来方便计算。如果你学过线性代数,了解矩阵的基本运算,那就很简单了。引入矩阵之后,假设函数H(x):
hθ(x)=θ0+θ1×1+θ2×2+θ3×3+…+θnxn
可以用矩阵表示成:
hθ(x)=[θ0 θ1 … θn][x0x1…xn]=θTx
简化后得到:
hθ(X)=θTX
Feature Scaling(特征缩放)和Mean Normalization(均值归一化)
为了提高梯度下降的速度,我们可以使得所有的样本输入值都大致在同一个较小的范围内。那为什么样本值不在同一个范围内会影响收敛的速度呢?我们知道梯度下降有一个学习曲率(learning rate),对于所有的输入样本数据都用同一个α值,如果样本数据之间变化范围太大,则会导致同一个α值对差异太大的数据收敛效果不同,从而影响整体的收敛效果。理想的情况,我们希望特征值的范围是[−1,1]或者[−0.5,0.5],但是这不是必须的。我们可以使用如下的公式来达到这样的效果:
xi:=xi−μisi
其中μi是特征i的均值,而si是样本的标准差,也就是max−min。结合以上公式粗略地解释下,特征缩放指的是除以某个值,而均值归一化指的是减去均值。
Polynomial Regression(多项式回归)
有时候为了达到更好的拟合效果,我们可以通过对已有的特征进行组合,从而得到新的特征,使得线性回归变成多项式回归。
Normal Equation
当你在使用梯度下降算法求cost function最小值的时候是否想过一个问题:我们好像是可以通过数学方法精确计算出cost function的最小值的。没错,因为说到底就是矩阵运算嘛。对于线性方程:hθ(X)=θTX而言,它的θ值可以通过下面的公式计算得出:θ=(XTX)−1XTy
其中,XT表示转置矩阵,而X−1表示逆矩阵。
Gradient Descent和Normal Equation的对比如下:
[table caption=””]
Gradient Descent,Normal Equation,
需要选择α值,不需要α值,
需要多次迭代计算,无需迭代计算,
复杂度是O(k∗n2),复杂度是O(n3),需要计算XTX的逆矩阵,
[/table]
那你肯定会问,既然θ值可以直接算出来为什么还要使用梯度下降算法一步一步去寻找最小值呢?那是因为计算逆矩阵的算法复杂度是O(n3),当特征数量很大的时候,Normal Equation算法就会变得非常地慢。
值得注意的是,并不是所有的矩阵都是可逆的。如果XTX是不可逆的,那么最可能是以下两种情况:
- 冗余的特征,比如两个特征非常接近,更直接的比如他们是线性相关的
- 特征数量太多
课后编程作业已经上传至本人GitHub,如有需要可以参考,但请遵守课堂准则,不要抄袭。
羽毛球杀球动作详解
 正手杀
正手杀
对角线球
反手杀直线球
腾空突击杀
高远球架拍
01
内旋挥拍,指前臂向内转动带动球拍旋转击球。在正手范围内,内旋挥拍击球具有很强的杀伤力。在反手击球时,外旋前也都会先向内旋,以增大加速过程。
▌外旋挥拍技术
外旋挥拍,指前臂向外转动带动球拍旋转击球。反手范围内外旋击球很具杀伤力。在大力击球时,内外旋手臂混合使用是很重要的。
02
▌举拍:姿势要正确
首先,两脚分开,然后我们开始举拍,举拍的时候大家注意以下几点。
▲拍面朝前,拍面面对网
▲小臂与大臂呈90度直角,但是你的小臂都不能夹太紧,也不能拉得太开
▲大臂与你的肩膀平行,不能放下来,也不能抬得太高。
▲手腕一定要竖起来
你的非持拍手要抬高点,要比你的右边的手臂(持拍手)要高一点,整个人是呈现一个倾斜的”山”字形。
▌引拍:身体和手肘一起转身
引拍的时候,是你的身体跟你的手肘一起转身,转身的时候手肘是自然的放在侧面抬起,手臂、手腕是不发力的,要保持放松的状态,球拍也会自然的向后倒。
手肘不用抬太高或者太低,而且不需要贴耳贴的很近。
因为在接下来小臂发力挥拍的时候,如果贴耳太近内旋发力会很别扭,同时击球点也会偏离头顶的正上方。
▌导拍:小臂内旋发力击球
小臂内旋发力击球,最后球拍在接触球的瞬间握紧球拍,击球后,球拍自然的放在你的异侧,千万不要把球拍放在你的同侧。这里提到了小臂内旋发力,注意初学者在无法理解小臂内旋发力之前,可先大臂带动小臂向前加速挥拍击球即可。
正手握拍屈指发力
击球前拇指、食指和中指放松,掌心与拍柄之间留有发力空间。为满足放松要求,拇指和食指只要贴在球拍柄上即可,不要用力紧握。击球时,食指和拇指扣住球拍柄,中指、无名指和小指紧握拍柄,以拇指和手掌末端的小鱼际肌为支点,其余手指为力点,由放松到抓紧,用近似杠杆原理的方法,屈指发力击球。
定点挥拍是羽毛球的最基础技术,每天可以挥拍20个一组,挥3~5组,只要坚持下去你一定会受益匪浅。
03
▌战术
有些球友因为挥拍过早,导致拍子打空了球,或者挥拍过慢,没有在拍子速度最快的瞬间击球。挥拍的最佳时机要准确把握“提前量”,这就需要精准地估计和把握对方的来球速度和弧度。另外,挥拍空间越大,发力和变化才越丰富。
04
▌提高身体协调性
羽毛球运动的挥拍速度主要和击球技术动作的正确性、协调性以及前臂、手腕、手指的快速力量有关。击球技术不正确、不协调,必然会影响人体在击球时的发力,挥拍的速度也因此受到很大影响。进一步纠正和完善自己的技术动作,提高自己的身体协调性,是提高挥拍速度的首要环节。
▌加强力量训练
其次,要加强快速力量素质的训练,尤其是要提高和发展对羽毛球击球发力至关重要的前臂、手腕和手指的爆发力。
▌挥拍方法
方法一:可采用轻负荷的手腕,快速颈后举,握力器等方法,来提高前臂,手腕和手指的爆发力。
方法二:可采用连续快速对墙击球,来提高平抽挡的挥拍速度,采用持壁球拍,软式网球拍或小哑铃做各种动作的挥拍练习,一次提高相应击球动作的挥拍速度。
—END—
版权声明
1、本文来源于网络,文章内容仅代表作者本人观点.
2、版权归相关权利人所有,尊重知识与劳动,转载请保留版权信息。如存在不当使用的情况,请随时与我们联系删除
羽毛球握拍——握对了才能正确发力
1、拍柄的宽面跟拍面平行,控好宽面就等于控制住了拍面朝向。
3、掌根小鱼际肌在发力击球时起重要支撑作用,此处不可空。

4、大鱼际肌也不可紧贴拍柄,否则会影响拇指发力。
5、拇指不可僵直竖顶在小斜面处,应斜靠宽面,位置低于食指高于中指,击球瞬间需屈指发力。

6、发力击球时,中指、无名指、小指应在拇指同侧扣住宽面,任何手指缺失都会削弱击球力度。
7、握拍是否灵活,请尝试用拇指和食指控制拍柄转动,如果可以轻易左右转动且精确回位,说明能熟练应用手指,如果转过去转不回来,说明还不能熟练操控手指肌肉。

8、虎口位置绝对不可紧贴拍柄,对手大的人来说虎口部位可以留空,对于手小的人确保虎口不受力即可。

9、反手握拍法与正手握拍法相比,手指与宽面位置,以及拍柄跟手掌的角度都会发生变化。通常反手大拇指内侧正面对宽面。


反手握拍,拇指高于食指
10、反手握拍时拇指位置略高于食指。
11、羽毛球靠惯性发力,当球拍与球托相碰时,拍头终速度起决定性作用,这不完全与选手绝对力量相关,如何让拍头加速曲线与球的运动轨迹相吻合需要很高技巧和长期练习。

12、发力是从脚开始,经腰、肩、上臂、肘、小臂、手腕、手指的一系列顺序传递以及累加过程,类似多级火箭加速,每一级加速后去掉部分质量且在上一级尾速度上继续加速,最终集中到手腕手指并一举Hold住拍柄。中间任何次序错误或停顿都会严重影响加速过程。
13、对于右手持拍的人来说,右脚经右腿、右髋、右肩、右臂、右肘最终至右手是一条力的作用和传递线,发力过程中,受力点不对或者身体过多晃动会影响这条力的作用线,造成发力不集中和落点不精准。
14、随势动作,其它球类运动中也有称为随挥动作的,就是击球后拍头还需要往球的飞行方向跟随一段距离,且有明显的送肩动作,对保证扎实发力非常重要。
15、上手高球技术中最大难点除走位外就是从到位预备动作到挥拍击球之间的衔接过程,这个过程要求身体多个肢体能做到独立运动且协调配合,非下苦功不成也。
—END—
版权声明
1、本文来源于网络,文章内容仅代表作者本人观点.
2、版权归相关权利人所有,尊重知识与劳动,转载请保留版权信息。如存在不当使用的情况,请随时与我们联系删除
单脚跳杀教程-空中挥拍-挥拍过程左右脚没有在一起过
相对于双脚跳杀,单脚跳杀更容易掌握,杀球力度虽不及双脚,但是也挺大,值得学习和使用。
谌龙单脚跳杀单脚跳杀的步骤和要点
一、准备
来球较高,适合正手杀球。身体为正手接高远球球姿势(身体侧对球网,右脚在后,左脚在前,膝盖微曲,身体重心在右脚上,球拍举起,在右肩膀上方,左手自然上举)
引拍动作
………………………………………………………………………………….
二、击球
当球下落到击球点时,右脚蹬地,向上弹跳,身体逆时针旋转,加上腹部发力,带动整个右臂。右手使用“甩鞭”击球。击球瞬间前臂旋内,手腕应迅猛地向下“扣压”,在球拍击到球的一瞬间,突然用力握紧球拍,使整个击球动作犹如“鞭打”,集中到击球点上。
单脚跳杀及杀后上网
单脚起跳标准跳杀
标准单脚起跳步伐特写
持拍正面标准动作演示
持拍侧面标准动作演示
有球侧面标准动作演示
有球侧面标准动作演示-慢动作
三、打完收工
击球后,随动作惯性球拍挥至左腹前后收回到胸前,左脚落地后向前蹬伸,同时右脚向击球方向迈出,以便迅速上网。
左右两侧标准跳杀动作演示
左右两侧标准跳杀动作演示-慢动作
单脚跳杀有网实战对练
慢动作
以上即是单脚跳杀的教程,在女运动员中经常看到单脚跳杀,男运动员一般用于吊球。
—END—
版权声明
1、本文来源于网络,文章内容仅代表作者本人观点.
2、版权归相关权利人所有,尊重知识与劳动,转载请保留版权信息。如存在不当使用的情况,请随时与我们联系删除
羽毛球训练总结
疫情来了,谁也没躲过。做好个人防疫的同时,工作、生活、运动(三架马车?)都不应该停止。在家上班,自由的时间变多了。健身房这种密闭的环境不敢去,羽毛球馆每人一个场,人和人之间都隔得比较开(自我安慰下,反正要打就对了)。既然这样,那就趁这个百年难遇的机会,请了个教练纠正下自己野鸡式的羽毛球动作。下面就记下自己训练和实战总结出适合自己的心得,时不时给自己敲敲钟,应该有助于自己填鸭式的练成肌肉记忆吧?!
1. 网前球注意球拍,脚步和拍到网前那一刻碰到球后球拍挺住不要切或者往上顶
2. 各种脚步移动的时候都是靠脚尖和两手,脚跟抬起
3. 正手挑球跟正手发球动作一致,只是站位不一样
4. 反手高远球脚要先着地后手再挥拍,如果同时的话手脚用的力是一个向后一个向前,互相抵消了
5. 左手要用力,左手要用力,左手要用力!准备时要用力,接球时要用力,杀球时也要用力!右手要放松,右手要放松,右手要放松!左手的用力才能给右手创造出轻松的环境!
6. 反手打墙要有往上拧的力,有点像打乒乓球拉球的感觉! 手腕和手指要同时用力!
7. 反手网前挑球抢高点,不用转拍!可以推高远球或挡贴网球
8. 反手头顶不要先跳!先退一步在跨就行!不要怕球落得低!
9. 接杀球时,速度要快,球拍放前面,脚步和球拍先到位,打球后边看球边回中!
10. 杀球前先把拍架好,这样右脚才会自然跨出去,击球前球拍会自然下垂
11. 准备的时候大臂有点要贴紧腰部,小臂微微抬起,和大臂大约成直角
12. 网前挑球球拍握上面一点,手放轻松只有小臂和手腕用力,腰和大臂不要用力!轻轻的往上挑不要用推,多点向上的力,剪掉向前的力!
13. 球拍捏紧不要太松!中前场球拍尽量握上面点,后场球拍才握到最下面!
14. 高远球和杀球击球点都在向前一点,这样身体才会一直保持直线不会后仰!!!把肩膀往上提立住,这样才不会后仰!
15. 网前球准备的时候球拍放前面,可以挑球放球,如果看球高了,可以最后右脚再垫半步杀球
16. 接杀球时两脚不要前后站,应该左右站!球拍正手握法,但是两个手指捏得一样高,类似打墙的招式
17. 挡网前球一定不要转球拍,手腕小臂都不要用力!就球拍捏紧,高点碰下球!
18. 正手网前小球接后场反手头顶,在后场击球的时候要用后腰后腰后腰的力量!这样打完球后才会有往前冲的力!
19. 前场小球接后场对角球,在前场右脚后退时,第一步要退大一点,这样在中间做一个小跳才会自然而不多余
20. 吊球时只要手腕和手指的力,不要用手肘和手臂
21. 高远球和杀球时全身放松,把要的力往上挤到球拍时快速挥出去,左手能抬多高就抬多高
22. 正反手打下压球时,左手要举起来,不要拖着
23. 网前杀球时身体不要下蹲!快速跑过去站稳,不要下蹲!然后球拍下压!反手位下压母子要顶上,跑位不要跑太过,刚好够到球就行
24. 中场反手球拍不要超过左肩膀,正手中场应该也是
25. 球场上追球或者回中的时候球拍不要下垂、后仰、拖着!一直都要自然的拿着放在身前中间!
26. 前场中场打球时尽量高点打,不要把球放身体后面打,所有打球的点要一直在胸前!胸前!胸前!
Webpack or Browserify & Gulp: Which Is Better?
As web applications grow increasingly complex, making your web app scalable becomes of the utmost importance. Whereas in the past writing ad-hoc JavaScript and jQuery would suffice, nowadays building a web app requires a much greater degree of discipline and formal software development practices, such as:
- Unit tests to ensure modifications to your code don’t break existing functionality
- Linting to ensure consistent coding style free of errors
- Production builds that differ from development builds
The web also provides some of its own unique development challenges. For example, since webpages make a lot of asynchronous requests, your web app’s performance can be significantly degraded from having to request hundreds of JS and CSS files, each with their own tiny overhead (headers, handshakes, and so on). This particular issue can often be addressed by bundling the files together, so you’re only requesting a single bundled JS and CSS file rather than hundreds of individual ones.
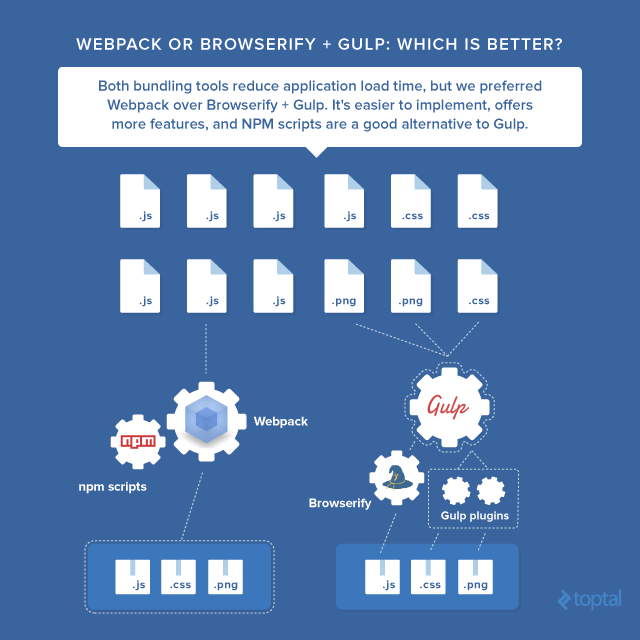
Which bundling tool should you use: Webpack or Browserify + Gulp? Here is the guide to choosing.
It’s also quite common to use language preprocessors such as SASS and JSX that compile to native JS and CSS, as well as JS transpilers such as Babel, to benefit from ES6 code while maintaining ES5 compatibility.
This amounts to a significant number of tasks that have nothing to do with writing the logic of the web app itself. This is where task runners come in. The purpose of a task runner is to automate all of these tasks so that you can benefit from an enhanced development environment while focusing on writing your app. Once the task runner is configured, all you need to do is invoke a single command in a terminal.
I will be using Gulp as a task runner because it is very developer friendly, easy to learn, and readily understandable.
A Quick Introduction to Gulp
Gulp’s API consists of four functions:
gulp.srcgulp.destgulp.taskgulp.watch

Here, for example, is a sample task that makes use of three of these four functions:
gulp.task('my-first-task', function() {
  gulp.src('/public/js/**/*.js')
  .pipe(concat())
  .pipe(minify())
  .pipe(gulp.dest('build'))
});
When my-first-task is performed, all the files matching the glob pattern /public/js/**/*.js are minified and then transferred to a build folder.
The beauty of this is in the .pipe() chaining. You take a set of input files, pipe them through a series of transformations, then return the output files. To make things even more convenient, the actual piping transformations, such as minify(), are often done by NPM libraries. As a result, it’s very rare in practice that you need to write your own transformations beyond renaming files in the pipe.
The next step to understand Gulp is understanding the array of task dependencies.
gulp.task('my-second-task', ['lint', 'bundle'], function() {
  ...
});
Here, my-second-task only runs the callback function after the lint and bundle tasks are completed. This allows for separation of concerns: You create a series of small tasks with a single responsibility, such as converting LESS to CSS, and create a sort of master task that simply calls all the other tasks via the array of task dependencies.
Finally, we have gulp.watch, which watches a glob file pattern for changes, and when a change is detected, runs a series of tasks.
gulp.task('my-third-task', function() {
  gulp.watch('/public/js/**/*.js', ['lint', 'reload'])
})
In the above example, any changes to a file matching /public/js/**/*.js would trigger the lintand reload task. A common use of gulp.watch is to trigger live reloads in the browser, a feature so useful for development that you won’t be able to live without it once you’ve experienced it.
And just like that, you understand all you really need to know about gulp.
Where Does Webpack Fit In?

When using the CommonJS pattern, bundling JavaScript files isn’t as simple as concatenating them. Rather, you have an entry point (usually called index.js or app.js) with a series of require or import statements at the top of the file:
ES5
var Component1 = require('./components/Component1');
var Component2 = require('./components/Component2');
ES6
import Component1 from './components/Component1';
import Component2 from './components/Component2';
The dependencies have to be resolved before the remaining code in app.js, and those dependencies may themselves have further dependencies to resolve. Furthermore, you might require the same dependency in multiple places in your application, but you only want to resolve that dependency once. As you can imagine, once you have a dependency tree a few levels deep, the process of bundling your JavaScript becomes rather complex. This is where bundlers such as Browserify and Webpack come in.
Why Are Developers Using Webpack Instead of Gulp?
Webpack is a bundler whereas Gulp is a task runner, so you’d expect to see these two tools commonly used together. Instead, there’s a growing trend, especially among the React community, to use Webpack instead of Gulp. Why is this?
Simply put, Webpack is such a powerful tool that it can already perform the vast majority of the tasks you’d otherwise do through a task runner. For instance, Webpack already provides options for minification and sourcemaps for your bundle. In addition, Webpack can be run as middleware through a custom server called webpack-dev-server, which supports both live reloading and hot reloading (we’ll talk about these features later). By using loaders, you can also add ES6 to ES5 transpilation, and CSS pre- and post-processors. That really just leaves unit tests and linting as major tasks that Webpack can’t handle independently. Given that we’ve cut down at least half a dozen potential gulp tasks down to two, many devs opt to instead use NPM scripts directly, as this avoids the overhead of adding Gulp to the project (which we’ll also talk about later).
The major drawback to using Webpack is that it is rather difficult to configure, which is unattractive if you’re trying to quickly get a project up and running.
Our 3 Task Runner Setups
I will set up a project with three different task runner setups. Each setup will perform the following tasks:
- Set up a development server with live reloading on watched file changes
- Bundle our JS & CSS files (including ES6 to ES5 transpilation, SASS to CSS conversion and sourcemaps) in a scalable manner on watched file changes
- Run unit tests either as a standalone task or in watch mode
- Run linting either as a standalone task or in watch mode
- Provide the ability to execute all of the above via a single command in the terminal
- Have another command for creating a production bundle with minification and other optimizations
Our three setups will be:
- Gulp + Browserify
- Gulp + Webpack
- Webpack + NPM Scripts
The application will use React for the front-end. Originally, I wanted to use a framework-agnostic approach, but using React actually simplifies the responsibilities of the task runner, since only one HTML file is needed, and React works very well with the CommonJS pattern.
We will cover the benefits and drawbacks of each setup so you can make an informed decision on what type of setup best suits your project needs.
I’ve setup a Git repository with three branches, one for each approach (link). Testing each setup is as simple as:
git checkout <branch name>
npm prune (optional)
npm install
gulp (or npm start, depending on the setup)
Let’s examine the code in each branch in detail…
Common Code
FOLDER STRUCTURE
- app
 - components
 - fonts
 - styles
- index.html
- index.js
- index.test.js
- routes.js
A straightforward HTML file. The React application is loaded into <div id="app"></div> and we only use a single bundled JS and CSS file. In fact, in our Webpack development setup, we won’t even need bundle.css.
This acts as the JS entry point of our app. Essentially, we’re just loading React Router into the divwith id app that we mentioned earlier.
This file defines our routes. The urls /, /about and /contact are mapped to the HomePage, AboutPage, and ContactPage components, respectively.
This is a series of unit tests that test native JavaScript behavior. In a real production quality app, you’d write a unit test per React component (at least ones that manipulate state), testing React-specific behavior. However, for the purposes of this post, it’s enough to simply have a functional unit test that can run in watch mode.
This can be thought of as the container for all our page views. Each page contains a <Header/>component as well as this.props.children, which evaluates to the page view itself (ex/ ContactPage if at /contact in the browser).
This is our home view. I’ve opted to use react-bootstrap since bootstrap’s grid system is excellent for creating responsive pages. With proper use of bootstrap, the number of media queries you must write for smaller viewports is dramatically reduced.
The remaining components (Header, AboutPage, ContactPage) are structured similarly (react-bootstrap markup, no state manipulation).
Now let’s talk more about styling.
CSS Styling Approach
My preferred approach to styling React components is to have one stylesheet per component, whose styles are scoped to only apply to that specific component. You’ll notice that in each of my React components, the top-level div has a class name matching the name of the component. So, for example, HomePage.js has its markup wrapped by:
<div className="HomePage">
  ...
</div>
There is also an associated HomePage.scss file that’s structured as follows:
@import '../../styles/variables';

.HomePage {
  // Content here
}
Why is this approach so useful? It results in highly modular CSS, largely eliminating the issue of unwanted cascading behavior.
Suppose we have two React components, Component1 and Component2. In both cases, we want to override the h2 font size.
/* Component1.scss */
.Component1 {
  h2 {
    font-size: 30px;
  }
}

/* Component2.scss */
.Component2 {
  h2 {
    font-size: 60px;
  }
}
The h2 font size of Component1 and Component2 are independent whether the components are adjacent, or one component is nested inside the other. Ideally, this means a component’s styling is completely self-contained, meaning the component will look exactly the same no matter where it is placed in your markup. In reality, it’s not always that simple, but it’s certainly a huge step in the right direction.
In addition to per-component styles, I like to have a styles folder containing a global stylesheet global.scss, along with SASS partials that handle a specific responsibility (in this case, _fonts.scss and _variables.scss for fonts and variables, respectively). The global stylesheet allows us to define the general look and feel of the entire app, while the helper partials can be imported by the per-component stylesheets as needed.
Now that the common code in each branch has been explored in depth, let’s shift our focus to the first task runner / bundler approach.
Gulp + Browserify Setup
This comes out to a surprisingly large gulpfile, with 22 imports and 150 lines of code. So, for the sake of brevity, I’ll only review the js, css, server, watch, and default tasks in detail.
JS BUNDLE
// Browserify specific configuration
const b = browserify({
  entries: [config.paths.entry],
  debug: true,
  plugin: PROD ? [] : [hmr, watchify],
  cache: {},
  packageCache: {}
})
.transform('babelify');
b.on('update', bundle);
b.on('log', gutil.log);

(...)

gulp.task('js', bundle);

(...)

// Bundles our JS using Browserify. Sourcemaps are used in development, while minification is used in production.
function bundle() {
  return b.bundle()
  .on('error', gutil.log.bind(gutil, 'Browserify Error'))
  .pipe(source('bundle.js'))
  .pipe(buffer())
  .pipe(cond(PROD, minifyJS()))
  .pipe(cond(!PROD, sourcemaps.init({loadMaps: true})))
  .pipe(cond(!PROD, sourcemaps.write()))
  .pipe(gulp.dest(config.paths.baseDir));
}
This approach is rather ugly for a number of reasons. For one thing, the task is split into three separate parts. First, you create your Browserify bundle object b, passing in some options and defining some event handlers. Then you have the Gulp task itself, which has to pass a named function as its callback instead of inlining it (since b.on('update') uses that very same callback). This hardly has the elegance of a Gulp task where you just pass in a gulp.src and pipe some changes.
Another issue is that this forces us to have different approaches to reloading html, css and js in the browser. Looking at our Gulp watch task:
gulp.task('watch', () => {
  livereload.listen({basePath: 'dist'});

  gulp.watch(config.paths.html, ['html']);
  gulp.watch(config.paths.css, ['css']);
  gulp.watch(config.paths.js, () => {
    runSequence('lint', 'test');
  });
});
When an HTML file is changed, the html task is re-run.
gulp.task('html', () => {
  return gulp.src(config.paths.html)
  .pipe(gulp.dest(config.paths.baseDir))
  .pipe(cond(!PROD, livereload()));
});
The last pipe calls livereload() if the NODE_ENV is not production, which triggers a refresh in the browser.
The same logic is used for the CSS watch. When a CSS file is changed, the css task is re-run, and the last pipe in the css task triggers livereload() and refreshes the browser.
However, the js watch doesn’t call the js task at all. Instead, Browserify’s event handler b.on('update', bundle) handles the reload using a completely different approach (namely, hot module replacement). The inconsistency in this approach is irritating, but unfortunately necessary in order to have incremental builds. If we naively just called livereload() at the end of the bundlefunction, this would re-build the entire JS bundle on any individual JS file change. Such an approach obviously doesn’t scale. The more JS files you have, the longer each rebundle takes. Suddenly, your 500 ms rebundles start taking 30 seconds, which really inhibits agile development.
CSS BUNDLE
gulp.task('css', () => {
  return gulp.src(
    [
      'node_modules/bootstrap/dist/css/bootstrap.css',
      'node_modules/font-awesome/css/font-awesome.css',
      config.paths.css
    ]
  )
  .pipe(cond(!PROD, sourcemaps.init()))
  .pipe(sass().on('error', sass.logError))
  .pipe(concat('bundle.css'))
  .pipe(cond(PROD, minifyCSS()))
  .pipe(cond(!PROD, sourcemaps.write()))
  .pipe(gulp.dest(config.paths.baseDir))
  .pipe(cond(!PROD, livereload()));
});
The first issue here is the cumbersome vendor CSS inclusion. Whenever a new vendor CSS file is added to the project, we have to remember to change our gulpfile to add an element to the gulp.src array, rather than adding the import into a relevant place in our actual source code.
The other main issue is the convoluted logic in each pipe. I had to add an NPM library called gulp-cond just to setup conditional logic in my pipes, and the end result isn’t too readable (triple brackets everywhere!).
SERVER TASK
gulp.task('server', () => {
  nodemon({
    script: 'server.js'
  });
});
This task is very straightforward. It’s essentially a wrapper around the command line invocation nodemon server.js, which runs server.js in a node environment. nodemon is used instead of node so that any changes to the file cause it to restart. By default, nodemon would restart the running process on any JS file change, which is why it’s important to include a nodemon.json file to limit its scope:
{
  "watch": "server.js"
}
Let’s review our server code.
const baseDir = process.env.NODE_ENV === 'production' ? 'build' : 'dist';
const port = process.env.NODE_ENV === 'production' ? 8080: 3000;
const app = express();
This sets the base directory of the server and the port based on the node environment, and creates an instance of express.
app.use(require('connect-livereload')({port: 35729}));
app.use(express.static(path.join(__dirname, baseDir)));
This adds connect-livereload middleware (necessary for our live reloading setup) and static middleware (necessary for handling our static assets).
app.get('/api/sample-route', (req, res) => {
  res.send({
    website: 'Toptal',
    blogPost: true
  });
});
This is just a simple API route. If you navigate to localhost:3000/api/sample-route in the browser, you will see:
{
  website: "Toptal",
  blogPost: true
}
In a real backend, you would have an entire folder dedicated to API routes, separate files for establishing DB connections, and so on. This sample route was merely included to show that we can easily build a backend on top of the frontend we have set up.
app.get('*', (req, res) => {
  res.sendFile(path.join(__dirname, './', baseDir ,'/index.html'));
});
This is a catch-all route, meaning no matter what url you type into the browser, the server will return our lone index.html page. It is then the responsibility of the React Router to resolve our routes on the client side.
app.listen(port, () => {
  open(`http://localhost:${port}`);
});
This tells our express instance to listen to the port we specified, and open the browser in a new tab at the specified URL.
So far the only thing I don’t like about the server setup is:
app.use(require('connect-livereload')({port: 35729}));
Given that we are already using gulp-livereload in our gulpfile, this makes two separate places where livereload must be used.
Now, last but not least:
DEFAULT TASK
gulp.task('default', (cb) => {
  runSequence('clean', 'lint', 'test', 'html', 'css', 'js', 'fonts', 'server', 'watch', cb);
});
This is the task that runs when simply typing gulp into the terminal. One oddity is the need to use runSequence in order to get the tasks to run sequentially. Normally, an array of tasks are executed in parallel, but this isn’t always the desired behavior. For example, we need to have the clean task run before html to ensure that our destination folders are empty before moving files into them. When gulp 4 is released, it will support gulp.series and gulp.parallel methods natively, but for now we have to leave with this slight quirk in our setup.
Beyond that, this is actually pretty elegant. The whole creation and hosting of our app is performed in a single command, and understanding any portion of the workflow is as simple as examining an individual task in the run sequence. In addition, we can break the whole sequence into smaller chunks for a more granular approach to creating and hosting the app. For example, we could set up a separate task called validate that runs the lint and test tasks. Or we could have a host task that runs server and watch. This ability to orchestrate tasks is very powerful, especially as your application scales and requires more automated tasks.
DEVELOPMENT VS PRODUCTION BUILDS
if (argv.prod) {
  process.env.NODE_ENV = 'production';
}
let PROD = process.env.NODE_ENV === 'production';
Using the yargs NPM library, we can supply command line flags to Gulp. Here I instruct the gulpfile to set the node environment to production if --prod is passed to gulp in the terminal. Our PROD variable is then used as a conditional to differentiate development and production behavior in our gulpfile. For example, one of the options we pass to our browserify config is:
plugin: PROD ? [] : [hmr, watchify]
This tells browserify to not use any plugins in production mode, and use hmr and watchifyplugins in other environments.
This PROD conditional is very useful because it saves us from having to write a separate gulpfile for production and development, which would ultimately contain a lot of code repetition. Instead, we can do things like gulp --prod to run the default task in production, or gulp html --prod to only run the html task in production. On the other hand, we saw earlier that littering our Gulp pipelines with statements such as .pipe(cond(!PROD, livereload())) aren’t the most readable. In the end, it’s a matter of preference whether you want to use the boolean variable approach or set up two separate gulpfiles.
Now let’s see what happens when we keep using Gulp as our task runner but replace Browserify with Webpack.
Gulp + Webpack Setup
Suddenly our gulpfile is only 99 lines long with 12 imports, quite a reduction from our previous setup! If we check the default task:
gulp.task('default', (cb) => {
  runSequence('lint', 'test', 'build', 'server', 'watch', cb);
});
Now our full web app setup only requires five tasks instead of nine, a dramatic improvement.
In addition, we’ve eliminated the need for livereload. Our watch task is now simply:
gulp.task('watch', () => {
  gulp.watch(config.paths.js, () => {
    runSequence('lint', 'test');
  });
});
This means our gulp watcher isn’t triggering any type of rebundling behavior. As an added bonus, we don’t need to transfer index.html from app to dist or build anymore.
Returning our focus to the task reduction, our html, css, js and fonts tasks have all been replaced by a single build task:
gulp.task('build', () => {
  runSequence('clean', 'html');

  return gulp.src(config.paths.entry)
  .pipe(webpack(require('./webpack.config')))
  .pipe(gulp.dest(config.paths.baseDir));
});
Simple enough. Run the clean and html tasks in sequence. Once those are complete, grab our entrypoint, pipe it through Webpack, passing in a webpack.config.js file to configure it, and send the resulting bundle to our baseDir (either dist or build, depending on node env).
Let’s have a look at the Webpack config file:
This is a pretty large and intimidating config file, so let’s explain some of the important properties being set on our module.exports object.
devtool: PROD ? 'source-map' : 'eval-source-map',
This sets the type of sourcemaps that Webpack will use. Not only does Webpack support sourcemaps out of the box, it actually supports a wide array of sourcemap options. Each option provides a different balance of sourcemap detail vs. rebuild speed (the time taken to rebundle on changes). This means we can use a “cheap” sourcemap option for development to achieve fast reloads, and a more expensive sourcemap option in production.
entry: PROD ? './app/index' :
[
  'webpack-hot-middleware/client?reload=true', // reloads the page if hot module reloading fails.
  './app/index'
]
This is our bundle entry point. Notice that an array is passed, meaning it’s possible to have multiple entry points. In this case, we have our expected entry point app/index.js as well as the webpack-hot-middleware entry point that’s used as part of our hot module reloading setup.
output: {
  path: PROD ? __dirname + '/build' : __dirname + '/dist',
  publicPath: '/',
  filename: 'bundle.js'
},
This is where the compiled bundle will be output. The most confusing option is publicPath. It sets the base url for where your bundle will be hosted on the server. So, for example, if your publicPathis /public/assets, then the bundle will appear under /public/assets/bundle.js on the server.
devServer: {
  contentBase: PROD ? './build' : './app'
}
This tells the server which folder in your project to use as the server’s root directory.
If you ever get confused about how Webpack is mapping the created bundle in your project to the bundle on the server, simply remember the following:
path+filename: The exact location of the bundle in your project source codecontentBase(as the root,/) +publicPath: The location of the bundle on the server
plugins: PROD ?
[
  new webpack.optimize.OccurenceOrderPlugin(),
  new webpack.DefinePlugin(GLOBALS),
  new ExtractTextPlugin('bundle.css'),
  new webpack.optimize.DedupePlugin(),
  new webpack.optimize.UglifyJsPlugin({compress: {warnings: false}})
] :
[
  new webpack.HotModuleReplacementPlugin(),
  new webpack.NoErrorsPlugin()
],
These are plugins that enhance Webpack’s functionality in some way. For example, webpack.optimize.UglifyJsPlugin is responsible for minification.
loaders: [
  {test: /\.js$/, include: path.join(__dirname, 'app'), loaders: ['babel']},
  {
    test: /\.css$/,
    loader: PROD ?
      ExtractTextPlugin.extract('style', 'css?sourceMap'):
      'style!css?sourceMap'
  },
  {
    test: /\.scss$/,
    loader: PROD ?
      ExtractTextPlugin.extract('style', 'css?sourceMap!resolve-url!sass?sourceMap') :
      'style!css?sourceMap!resolve-url!sass?sourceMap'
  },
  {test: /\.(svg|png|jpe?g|gif)(\?\S*)?$/, loader: 'url?limit=100000&name=img/[name].[ext]'},
  {test: /\.(eot|woff|woff2|ttf)(\?\S*)?$/, loader: 'url?limit=100000&name=fonts/[name].[ext]'}
]
These are loaders. Essentially, they pre-process files that are loaded through require()statements. They are somewhat similar to Gulp pipes in that you can chain loaders together.
Let’s examine one of our loader objects:
{test: /\.scss$/, loader: 'style!css?sourceMap!resolve-url!sass?sourceMap'}
The test property tells Webpack that the given loader applies if a file matches the provided regex pattern, in this case /\.scss$/. The loader property corresponds to the action the loader performs. Here we are chaining together the style, css, resolve-url and sass loaders, which are executed in reverse order.
I must admit that I don’t find the loader3!loader2!loader1 syntax very elegant. After all, when do you ever have to read anything in a program from right to left? Despite this, loaders are a very powerful feature of webpack. In fact, the loader I just mentioned allows us to import SASS files directly into our JavaScript! For instance, we can import our vendor and global stylesheets in our entrypoint file:
INDEX.JS
import React from 'react';
import {render} from 'react-dom';
import {Router, browserHistory} from 'react-router';
import routes from './routes';
// CSS imports
import '../node_modules/bootstrap/dist/css/bootstrap.css';
import '../node_modules/font-awesome/css/font-awesome.css';
import './styles/global.scss';

render(<Router history={browserHistory} routes={routes} />, document.getElementById('app'));
Similarly, in our Header component we can add import './Header.scss' to import the component’s associated stylesheet. This also applies to all our other components.
In my opinion, this can almost be considered a revolutionary change in the world of JavaScript development. There’s no need to worry about CSS bundling, minification, or sourcemaps since our loader handles all of this for us. Even hot module reloading works for our CSS files. Then being able to handle JS and CSS imports in the same file makes development conceptually simpler: More consistency, less context switching, and easier to reason about.
To give a brief summary of how this feature works: Webpack inlines the CSS into our JS bundle. In fact, Webpack can do this for images and fonts as well:
{test: /\.(svg|png|jpe?g|gif)(\?\S*)?$/, loader: 'url?limit=100000&name=img/[name].[ext]'},
{test: /\.(eot|woff|woff2|ttf)(\?\S*)?$/, loader: 'url?limit=100000&name=fonts/[name].[ext]'}
The URL loader instructs Webpack to inline our images and fonts as data urls if they are under 100 KB, otherwise serve them as separate files. Of course, we can also configure the cutoff size to a different value such as 10 KB.
And that’s Webpack configuration in a nutshell. I will admit there’s a fair amount of setup, but the benefits of using it are simply phenomenal. Although Browserify does have plugins and transforms, they simply cannot compare to Webpack loaders in terms of added functionality.
Webpack + NPM Scripts Setup
In this setup, we use npm scripts directly instead of relying on a gulpfile for automating our tasks.
PACKAGE.JSON
"scripts": {
  "start": "npm-run-all --parallel lint:watch test:watch build",
  "start:prod": "npm-run-all --parallel lint test build:prod",
  "clean-dist": "rimraf ./dist && mkdir dist",
  "clean-build": "rimraf ./build && mkdir build",
  "clean": "npm-run-all clean-dist clean-build",
  "test": "mocha ./app/**/*.test.js --compilers js:babel-core/register",
  "test:watch": "npm run test -- --watch",
  "lint": "esw ./app/**/*.js",
  "lint:watch": "npm run lint -- --watch",
  "server": "nodemon server.js",
  "server:prod": "cross-env NODE_ENV=production nodemon server.js",
  "build-html": "node tools/buildHtml.js",
  "build-html:prod": "cross-env NODE_ENV=production node tools/buildHtml.js",
  "prebuild": "npm-run-all clean-dist build-html",
  "build": "webpack",
  "postbuild": "npm run server",
  "prebuild:prod": "npm-run-all clean-build build-html:prod",
  "build:prod": "cross-env NODE_ENV=production webpack",
  "postbuild:prod": "npm run server:prod"
}
To run development and production builds, enter npm start and npm run start:prod, respectively.
This is certainly more compact than our gulpfile, given we’ve cut 99 to 150 lines of code down to 19 NPM scripts, or 12 if we exclude the production scripts (most of which just mirror the development scripts with the node environment set to production). The drawback is that these commands are somewhat cryptic compared to our Gulp task counterparts, and not quite as expressive. For example, there’s no way (at least that I know of) to have a single npm script run certain commands in series and others in parallel. It’s either one or the other.
However, there is a huge advantage to this approach. By using NPM libraries such as mocha directly from the command line, you don’t need to install an equivalent Gulp wrapper for each (in this case, gulp-mocha).
Instead of NPM installing
- gulp-eslint
- gulp-mocha
- gulp-nodemon
- etc
We install the following packages:
- eslint
- mocha
- nodemon
- etc
Quoting Cory House’s post, Why I Left Gulp and Grunt for NPM Scripts:
I was a big fan of Gulp. But on my last project, I ended up with hundreds of lines in my gulpfile and around a dozen Gulp plugins. I was struggling to integrate Webpack, Browsersync, hot reloading, Mocha, and much more using Gulp. Why? Well, some plugins had insufficient documentation for my use case. Some plugins only exposed part of the API I needed. One had an odd bug where it would only watch a small number of files. Another stripped colors when outputting to the command line.
He specifies three core issues with Gulp:
- Dependence on plugin authors
- Frustrating to debug
- Disjointed documentation
I would tend to agree with all of these.
1. Dependence on Plugin Authors
Whenever a library such as eslint gets updated, the associated gulp-eslint library needs a corresponding update. If the library maintainer loses interest, the gulp version of the library falls out of sync with the native one. The same goes for when a new library is created. If someone creates a library xyz and it catches on, then suddenly you need a corresponding gulp-xyz library to use it in your gulp tasks.
In a sense, this approach just doesn’t scale. Ideally, we would want an approach like Gulp that can use the native libraries.
2. Frustrating to Debug
Although libraries such as gulp-plumber help alleviate this issue considerably, it’s nonetheless true that error reporting in gulp just isn’t very helpful. If even one pipe throws an unhandled exception, you get a stack trace for an issue that seems completely unrelated to what’s causing the issue in your source code. This can make debugging a nightmare in some cases. No amount of searching on Google or Stack Overflow can really help you if the error is cryptic or misleading enough.
3. Disjointed Documentation
Oftentimes I find that small gulp libraries tend to have very limited documentation. I suspect this is because the author usually makes the library primarily for his or her own use. In addition, it’s common to have to look at documentation for both the Gulp plugin and the native library itself, which means lots of context switching and twice as much reading to do.
Conclusion
It seems pretty clear to me that Webpack is preferable to Browserify and NPM scripts are preferable to Gulp, although each option has its benefits and drawbacks. Gulp is certainly more expressive and convenient to use than NPM scripts, but you pay the price in all the added abstraction.
Not every combination may be perfect for your app, but if you want to avoid an overwhelming number of development dependencies and a frustrating debugging experience, Webpack with NPM scripts is the way to go. I hope you will find this article useful in choosing the right tools for your next project.
Protected: 2020,雪上加霜
疫情阴影下,所有的资产篮子都打翻了
本方转自:BBC
“鸡蛋不要都放在一个篮子里。”即便没有学过投资,也懂得这个全球通行的道理。分散投资品类,规避风险,往往作为投资界的金科玉律使用。
但没人教过,如果“所有的篮子都打翻了”,鸡蛋该怎么办?
不同的资产类别,面临的风险不同。当投资者担忧出现经济危机时,倾向于卖出高风险资产,买入低风险资产规避;当经济扩张时,则反之。
目前新冠全球大流行引发的金融动荡中,则罕见出现各类资产都遭抛售的景象——路透社称,疫情引发严重的经济担忧,在金融市场掀起无差别抛售潮,股票、黄金、外汇、大宗商品、发达国家及新兴市场债券统统遭抛售。
抛售一切背后的逻辑是什么?对普通人有何影响?
黄金、“数字黄金”都暴跌
“无差别抛售”,随着疫情迅速蔓延,以一种瞠目结舌的方式展开。
以3月18日为例,欧洲各股市继续下跌,亚洲恒生指数跌幅大4%,美股则在这周跌出了2008年后单周最大跌幅的纪录;传统的避险资产,之前大量资金涌入的债市也遭抛售而暴跌,十年期美国国债和30年期英国国债都遭到抛售。
“盛世古董,乱世黄金”原本背后的逻辑是,黄金作为硬通货,在战争和金融动荡时可以很好地抗通胀,而古董则代表高收益高风险的投资品,则随着经济发展而水涨船高。
然而黄金也意外地遭到抛售。3月第二周,金价一路下跌,一周跌掉8.6%,创下1983年来最大单周跌幅纪录。3月18日则再重挫30美元。

不仅黄金在跌,有“数字黄金”之称的比特币,跌得更惨。比特币因为设计总量恒定,不能随意增发,同时认知度高,因此被认为与黄金类似具有抗通胀属性。在2018年新兴市场恶性通胀中,一些国家如委内瑞拉的民众会买入比特币来抵御风险。
3月12日,短短30分钟,比特币价格跳水,从7300美元跌至5500美元,第二天继续下跌,最低时仅3800美元。一天之内,竟被“腰斩”。下跌幅度之大在各类资产中仅见。
这种状况让投资者损失惨重。基金领域的龙头桥水基金,以对抗各种经济波动的“全天候”基金闻名,成功渡过2008年金融危机甚至盈利,但却在本轮下跌中遭受了两位数降幅的损失。
为何“抛售一切”?

连避险资产也遭到抛售的原因之一是,跌的资产太多,投资者只好卖出还有盈利的避险资产来满足其他领域的流动性。
比如,由于沙特和俄罗斯没有达成减产协议,国际油价意外暴跌,让疫情打击下的市场雪上加霜,一些投资者在大宗商品市场和投资市场双双出现流动性危机,只好卖出表现不至于太差的黄金和债券,以补充流动性,应对在这些市场的追缴保证金。
另一个原因是,疫情的影响是全球性的,几乎所有的主要经济体都卷入其中。中国和美国则属于影响最大的国家之列,这两个国家不仅是全球最大的经济体,而且一个是全球最大消费市场,一个是全球最大产能国。
这使投资者担心一场席卷全球的经济衰退,而不是区域性的。
上一次普遍有这种担忧是2008年金融危机。在对市场悲观时,交易员倾向于买入避险资产;但当交易员到了恐慌的程度,就会抛售一切资产,增加流动性。
路透社援引美国银行的调查称,市场暴跌使2008年的记忆重现,投资者感到惊慌并纷纷套现,现金持仓比例平均升至5.1%,仅略低于2008年金融危机期间的5.5%。
现金为王?

现金为王的思维下,美元成为“无差别抛售”中唯一的例外。作为流动性最好的货币和安全资产,美元强劲上扬,兑所有主要货币一路走高。美联储甚至先后与14家央行建立互换额度,以缓解全球美元流动性短缺的问题。
“如果说现金为王,那么美元现金现在是全球的总统,”伦敦ING的外汇策略主管透纳(Chris Turner)称,“所有能卖的,都被卖出套现,转而买入美元。如果认为这种情况很快会扭转,那就太傻了,这可能会一直持续到新冠疫情消退。
对普通人意味着什么
对于并不持有股票、债券等资产的普通人而言,这种情况依然不是好消息。
因为大部分成年人都拥有一份养老金,这些养老金通过各种方式投入股市。
在美国,401k养老金账户通过投入基金的方式参与股市;在香港,每个就业人口都要参与的强制性公积金,也可通过基金的方式参与全球股市的投资;即便比较保守的中国大陆的养老金“社保基金”也允许一定比例投资到股市中。
即便连养老金也没有,依然会产生影响。经济危机下,消费减少,这些产品产品,或者至少一些部件来自中国、印度等国,工厂开工率降低,意味着当地工人会被减薪,甚至辞退,他们也会进一步减少自己的需求。经济由于需求减少而陷入某种恶性循环。
对于发展中国家而言,这种打击尤甚。因为当全球市场动荡时,全球投资者通常会首先退出新兴市场。

独立智库海外发展研究所(ODI)的经济学家兼高级研究人员拉加(Sherilynn Raga)表示,“流入的钱少了,这个国家的经济就会表现不佳,通常会进一步导致货币贬值。货币贬值可能意味着生活成本上升。”
对于发展中国家来说,债务是司空见惯的,而货币贬值意味着这些国家必须更加努力地偿债。
各国政府甚至不得不削减卫生和社会服务经费,以偿还债务。
如何救市
为了稳住经济,美联储的货币政策快速出台,在两次“紧急降息”后,联邦储备金利率降至接近零。证券市场却被又快又急的降息吓坏了,创下单周最大跌幅,之后再次刷新这一纪录。
“货币宽松无法真正扭转风险偏好,真正有用的是强有力的防疫措施、是疫苗、是特效药,而货币宽松的安慰剂是没用的。”粤开证券首席经济学家李奇霖表示,投资者需要关注的是疫情能否有效防控,美联储能做的是只是延缓出清的时间,在疫情没控制前,无法改变出清的命运。
中国金融四十人论坛高级研究员张斌认为,这种环境下的市场很脆弱,正常运行都艰难更不用提投资,货币条件放松对激发市场扩大消费和投资有帮助但远远不够。扩大财政支出不能缺位。

3月25日,美国白宫官员称,参议院和特朗普政府官员已经就一项大规模经济刺激法案达成协议,以减轻新冠病毒疫情对经济的影响。该刺激计划的规模预计为2万亿美元。
东京三菱UFJ国际投信首席基金经理人石金淳表示,“这肯定是个很大的数字,相当于美国国内生产总值(GDP)的10%左右,这应该能够支撑股市及其他冒险交易。”
石金淳认为,中期而言美国已经提出一套非常强大的财政及货币政策。在这么多的政策援助下,我们可能已经见到美国股市底部。
有什么好消息吗?
疫情汹涌,当人们面临失业的风险和生命的威胁时,很难找到什么好消息。
但是,从纯粹投资角度来讲,较低的股价,提供更好的买入机会,以期待它们在未来会逐步涨到高点。
确实,购买股票的最佳时机,就是复苏之前的最低价。
但是专家警告,任何想要抄底的投资者都要面临股市进一步下滑的风险。
